***See centerpoint-time-clock-setup.htm instead.
CenterPoint Payroll
- CenterPoint Time Clock - CenterPoint Time Clock Setup
Related Help

The CenterPoint online Time Clock, which works along with CenterPoint Payroll, enables employees and supervisors to enter time manually or clock in/out and manage time off requests. That information can then be imported directly into CenterPoint Payroll. The setup of the CenterPoint Time Clock module is a prerequisite for using the CenterPoint Time Clock website, app and kiosk.
There are three ways to enter time with the CenterPoint Time Clock:
- Website - Employees go to a secure website where they clock in and out or manually enter time, as well as request time off.
-
CenterPoint Time Clock app (on a phone or mobile device) - Employees install the CenterPoint Time Clock app, which can easily be downloaded for Apple and Android users. Login information from the website can be used to log into the app. Employees log in to the app where they clock in and out or manually enter time, as well as request time off.
- Shared Kiosk - The Kiosk is for employers who require centralized clock in/clock out capabilities for their employees. Employees receive a pin from their employer, which allows them to clock in and out on a shared device. No employee setup is required for the kiosk, since it’s pulled from within CenterPoint Payroll.
Step 1: Setting Up CenterPoint Time Clock in CenterPoint Payroll
Step 2: Accessing the Time Clock Website for Administrators and Supervisors
Step 3: Choosing How Employees Will Access the CenterPoint Time Clock
Option 1: CenterPoint Time Clock Website or CenterPoint Time Clock App
Download, Install, and Use the CenterPoint Time Clock App (Optional)
Step 1: Setting Up CenterPoint Time Clock in CenterPoint Payroll
The CenterPoint Time Clock is set up within the CenterPoint Payroll software. The setup of the CenterPoint Time Clock module is a prerequisite for using the CenterPoint Time Clock, app and Kiosk.
1. Preparing CenterPoint Payroll for Time Clock Settings
If you need your employees to track their time by multiple earning codes (for example Hourly, Vacation or PTO), or if you will be allowing time off requests, pay defaults are required. There is typically a one-to-one relationship between a pay default and an earning code for time clock setup. This means you should set up a pay default for each earning code your employees are currently using, or if you are currently using pay defaults, you can continue to use them as long as they have an earning attached. If you will track your employee time via one earning code, like hourly, you can skip this section and move on to step 1-2. See the steps below to add pay defaults.
- Select Setup > Payroll Details > Pay Defaults, and then click New.
- Enter an Abbreviation and Name for the pay default you are creating. For example, Hrly for Abbreviation and Hourly for Name.
- In the Earning box, select one of the earnings you will be tracking time for, for example Hourly, Sick, Vacation, etc.
- Click Save.
- Repeat for each earning that time will be tracked for.
Note: For additional information, see the Using Pay Defaults documentation.
2. Add the CenterPoint Time Clock Module
- If CenterPoint is not open, start CenterPoint by double-clicking your CenterPoint icon on your desktop.
- Select File > Administration > Module Configuration Manager.
- Select CenterPoint Time Clock and then click OK twice.
- Close CenterPoint, double-click the CenterPoint icon on your desktop to restart it, and then open your database.
3. Time Clock Employee Groups (Optional)
- Select Setup > Payroll Details > Time Clock Groups
- In the Abbreviation box, enter up to ten unique characters of information that you can easily identify the group by.
- Enter a group Name.
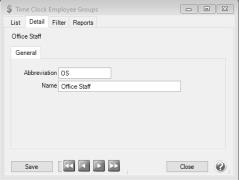
- Click Save.
4. Time Clock Settings
- Select Setup > Payroll Details > Time Clock Settings.

- On the General tab, click Register and wait while the time clock registration and synchronization takes place. When it is complete, a Registered Company Code will display. Take note of the Registered Company Code. The Registered Company Code is used if your employees will be using the website or app. The Company Code is not required for the Kiosk setup.
- Select the Administration tab.
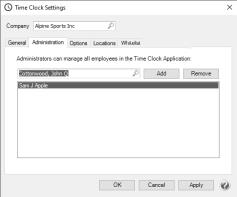
- On the Administration tab, Administrators are assigned to the time clock. Administrators have full rights over all employee time entries as well as time clock setup. Select the employee and then click Add. You can add as many Administrators as necessary for your company. If you are using the CenterPoint Time Clock Kiosk, you will need to add at least one Administrator. To remove Administrators, select the employee in the lower list and click Remove.
- Select the Options tab.

- The following selections determine how employees see things on the CenterPoint Time Clock screen:
- In the Time/Format box, select whether you want time to display in AM/PM format or Military format.
- In the Hour Format box, select whether you want activity to display in Decimal (6.25) or Hours and Minutes (6h 15m) format.
- Set the When importing, round Clock-In and Out times to the nearest minutes, to a number greater than zero if you want your time entries rounded when they are imported into CenterPoint Payroll Time Sheets.
Note: You would only set this setting if your employees will be clocking in and out using the website, app or kiosk. This setting does not apply to manually entered time.
Rounded to the nearest 5 minutes
(1-2 minutes round down and 3-4 minutes round up)8:03 am = 8:05am 8:02 am = 8:00 am 5:03 pm = 5:05 pm 7:56 am = 7:55 am 7:57 am = 7:55 am 7:58 am = 8:00 am 7:59 am = 8:00 am 4:58 pm = 5:00 pm Group Options
The Group Options section allows you to configure CenterPoint Time Clock settings by Employee Group.
If you set up optional employee groups in Step 3, select a group otherwise leave the <Default> setting so the selections you make in this section will apply to all employees. The Default settings will also apply to any employees who are not assigned to a group.
- Select the Allow Manual Time Entry check box if you want to allow employees to create (add/edit/delete) manual time entries or delete Clock-In/Out entries (manual time entries only apply to the CenterPoint Time Clock website and app). This box should remain unchecked if you want your employees to use the clock in and out functionality.
Note: Manual entries are allowed to span multiple days without start/stop times. When imported into CenterPoint Payroll time sheets, hours are divided by the days in range, i.e. 01/01/20 through 01/03/20 with 24 hours total would create 3 time sheets each for 8 hours with any rounding adjustments carried into the last time sheet generated.
Note: Employees who are allowed to add manual time can edit Clock In/Out entries. Editing a Clock In/Out entry converts it to a manual entry.
Note: When the Allow Manual Entry check box is not selected, Supervisors/Administrators can still create (add/edit/delete) manual entries for their employees, however, Supervisors cannot create (add/edit/delete) manual entries for themselves unless they are also an Administrator.
- Select the Allow Time Off Requests check box if you want CenterPoint Time Clock to allow your employees to request time off. Time off requests functionality is available through the CenterPoint Time Clock website and app. Pay defaults are required to use this functionality, see Step 1-1 for pay default instructions.
Select the Restrict Clock In/Out to GPS Locations check box if your employees will only be able to Clock-In/Out through the CenterPoint Time Clock website and app if their GPS coordinates place them within the determined radius one of the defined locations set on the Setup > Time Clock Settings > Locations tab.
- The Can Enter Time Through Web Application check box is selected by default and will allow employees in the group to enter time on the CenterPoint Time Clock website.
- The Allow Manual Time Entry selection still applies, so if this is not set, employees in the group will only be able to clock in/out on the CenterPoint Time Clock website.
- If you unselect the check box, employees in the group can still use the CenterPoint Time Clock website with limited access (the Clock In/Out buttons on the main screen and the add/edit/delete functionality on the Activity screen will not be available).
The Can Enter Time Through Mobile Application check box is selected by default and will allow employees in the group to enter time on the CenterPoint Time Clock app.
- The Allow Manual Time Entry selection still applies, so if this is not set, employees in the group will only be able to clock in/out on the CenterPoint Time Clock app.
- If you unselect the check box, employees in the group can still use the CenterPoint Time Clock app with limited access (the Clock In/Out buttons on the main screen and the add/edit/delete functionality on the Activity screen will not be available).
- Select the Automatic Unpaid Lunch Break to a number greater than zero if you want to adjust clocked time by a break. When your employees Clock Out, they will be prompted to select Yes or No for the Break Taken Today?. If the employee chooses yes, the break time identified in the setup will automatically be deducted from the time entry.
Note: Only clocked activity can be adjusted by a break. If the activity is more than the break minutes set, then the break minutes are subtracted from the displayed hours and the adjusted time cannot result in zero or negative hours. If the activity is equal to or less than the break minutes an adjustment is not made. Adjustments will display on the Activity screens with theicon.
- Select Additional fields your employees need to track on time cards. Fields selected here will display for your employees when they are clocking out or entering manual time. If the additional fields selected in step 4 are required, select the Require Selected Fields check box.
Note: Select pay defaults here if you set up pay defaults above in Step 1-1.
- Repeat the Group configuration for each Group.
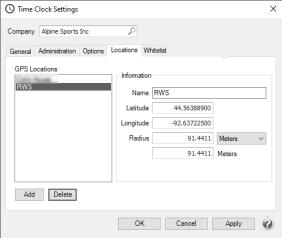
- If you are restricting clock in/clock out entries within the radius of specific GPS locations, select the Locations tab.
- Click Add.
- Enter the Name of the location. The name is used for display purposes.
- Enter the Latitude and Longitude coordinates of the location.
- Enter the Radius area from the coordinates of the GPS location where the employees can log in, and then select either Meters, Kilometers, Miles, or Yards.
Note: You can find latitude and longitude coordinates for a location from www.googlemaps.com by searching for an address, right-clicking on the location on the displayed map, and selecting What's Here?.
- Click Apply.
- Click OK.
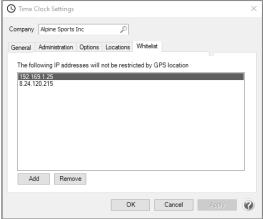
- If you are restricting clock in/clock out entries within the radius of specific GPS locations, select the Whitelist tab to allow exceptions to be made for certain IP addressess so they are not stopped by the GPS restrictions, for example for employees who clock in/out from computers in your office rather than from a mobile device.
- Click Add and enter the IP Address(es) that should not be restricted by GPS location.
-
Click OK.
5. Setting Up Employees
- Select Setup > Employees.
- Select an employee that will be using CenterPoint Time Clock.
- Select the Time Clock tab.
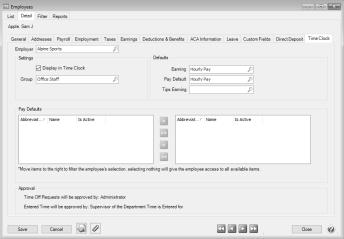
- Under Settings, the Display in Time Clock check box will be selected by default to indicate the employee is active and will display in CenterPoint Time Clock. If the employee is not active in Time Clock, unselect the check box. This selection is available to be changed for multiple employees at once by following the Employee Mass Update documentation..
- If you set up optional employee groups in step 3, select the Group this employee belongs to. If no group is selected, they will use the settings configured for the Default group.
- Under Defaults, select the default Earning that should be used when time is imported into CenterPoint Payroll from CenterPoint Time Clock. For example, it would be common to select an hourly earning code. The default earning is used for any entries where a pay default is not specified. For example, if your employee always clocks time for the same earning, Hourly, then you don't need to set up pay defaults and all entries are assigned this earning.
- If you will be using pay defaults (see step 1-1), select the default Pay Default. Pay defaults are commonly used for earnings, for example, a pay default can be created to enter time for Hourly, PTO, Vacation, Holiday, Overtime, etc. Pay Defaults can be turned on as a displayed field ,but they are not required. If Pay Default is a displayed field and it is left blank, the default pay default is used.
- If your employees will be reporting tips earned during their shift when they clock out, select the Tips Earning code that should be used when importing time into CenterPoint.(the same earning should also be added to Setup > Employees > Earnings tab for the employee). A separate time sheet will be created during the import for tip earnings for each employee.
- Under Pay Defaults, move the pay default(s) that are applicable to this employee to the right side of the screen, for example, you may have 20 hourly earning codes, but your employee only works in three of the 20. Typically, you will assign the pay defaults that are equivalent to the earnings on the Earnings tab of the employee.
- If you require supervisors to approve time before you draw time entries into CenterPoint Payroll, use one of the methods below:
- Method 1 - Employee Reports to One Supervisor and Department
- Select the Employment tab.
- Method 1 - Employee Reports to One Supervisor and Department
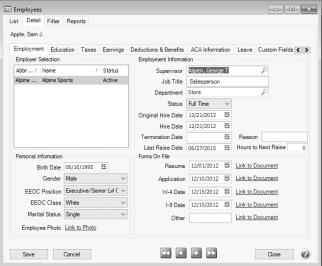
- In the Supervisor box, select the employee's supervisor. The assigned supervisor will be responsible for approving time off requests and entered time.
- In the Department box, select the employee's department.
- Click Save.
Note: If you have multiple employees with the same supervisor or default earnings/pay defaults, you can assign them to multiple employees at once by following the Employee Mass Update documentation.
- Method 2 - Employee Reports to Multiple Supervisors
- Select the Employment tab. Do not assign a supervisor, leave the supervisor box blank.
- In the Department box, select the employee's default department. The supervisor of this department will approve time off requests for this employee.
- Click Save.
- When the employee has time entered in multiple departments, the department supervisor assigned in Payroll Details > Payroll Departments/Groups will be responsible for approving time entered for this employee.
- Method 3 - Employee does not have a Specific Supervisor or Department
- Leave the Supervisor and Department blank on the Setup > Employee > Employment tab. Time off requests will be approved by the Administrator and entered time will be approved by the supervisor of the department time is entered for or the Administrator.
- Under the Approval section:
- If the employee has a Supervisor assigned on the Setup > Employees > Employment tab, the time off requests and time entered will display as the assigned Supervisor.
- If the employee does not have a supervisor, but does have a department assigned, the time off requests will display the department supervisor and entered time will be the supervisor of the department time is entered for.
- If the employee does not have a supervisor or department assigned, time off requests will display as Administrator and time entered will display as Administrator or supervisor of the department time is entered for.
Step 2: Accessing the Time Clock Website for Administrators and Supervisors
After the CenterPoint Payroll time clock setup is complete:
-
If your administrator and/or supervisors previously registered with either CenterPoint Employee Portal or Publish Pay Advices, they can sign in with their existing username and password and do not need to re-register. Follow steps 1 - 2 of the Accessing the Time Clock Website for Administrators and Supervisors section of this document and then continue with the next section. Documentation is available for your Administrators and Supervisors from the following: CenterPoint Time Clock for Supervisors or Supervisors Quick Reference.
-
If your administrator and/or supervisors have not previously registered with either CenterPoint Employee Portal or Publish Pay Advices, they will need to register for the CenterPoint Time Clock. using the section below. You will need to provide them with the Company Code (located in Setup > Payroll Details > Time Clock Settings > General tab) and their Employee Abbreviation. Continue with steps 1- 15 in this section. Documentation is available for your Administrators and Supervisors from the following: CenterPoint Time Clock for Supervisors or Supervisors Quick Reference.
- From a web browser, enter https://timeclock.redwingsoftware.com.
- Click Log In.
- Click Create One! to create an identity.
- Enter your First Name and Last Name.
- Enter an Email address and a Confirm Email address.
- Enter a Password and Confirm Password. Passwords must be at least six characters and no longer than 25 characters, include one numerical character and one lower case letter.
- Click Create. This will send an email to the address you entered above.
- Check the email address you provided above for an email from Red Wing Software.
Note: If the email is not received, please look in your Junk email folder.
- Click the here link in the email.
- From your web browser, click the CenterPoint Time Clock tab or return to https://timeclock.redwingsoftware.com.
- Click Proceed.
- Enter the Company Code provided to you by your payroll administrator. This code can be located on the Time Clock Settings screen (Setup > Payroll Details > Time Clock Settings > General tab).
- Enter your Employee Code (this is the employee Abbreviation used in CenterPoint Payroll located in Setup > Employees).
- Select the Time Zone you work in. This will determine how the time clock displays when logged into CenterPoint Time Clock.
- Click Submit. If you were not previously enrolled with Publish Pay Advices or CenterPoint Employee Portal and you completed Step 1-15, a confirmation email will be sent from CenterPoint Time Clock to the email address you provided during registration.
Note: If the email is not received, please look in your Junk email folder.
Step 3: Choosing How Employees Will Access the CenterPoint Time Clock
Option 1: CenterPoint Time Clock Website or CenterPoint Time Clock App
Employees can log time through the website, app or kiosk.
-
If your employees previously registered with either CenterPoint Employee Portal or Publish Pay Advices, they can sign in with their existing username and password and do not need to re-register. Provide your employees with the following documentation pieces: Using CenterPoint Time Clock for Employees, Employee Quick Reference for CenterPoint Time Clock Website, or Employee Quick Reference for the CenterPoint Time Clock App. Continue with the Download, Install and Use the CenterPoint Time Clock App (Optional) section of this document or if your employees will be using the kiosk, you can skip this section and go to Option 2.
-
If you will be allowing access to the CenterPoint Time Clock via the website or app and your employees have not previously registered with either CenterPoint Employee Portal or Publish Pay Advices, your employees will need to register for the CenterPoint Time Clock. Follow the Employee Registration Process section below. If your employees will be using the kiosk, you can skip this section and go to Option 2.
Employee Registration Process for the CenterPoint Time Clock Website
If you use the CenterPoint Time Clock website or the CenterPoint Time Clock app, first provide your employees with your Company Code and their Employee Code and register on the CenterPoint Time Clock website, then either continue to use the CenterPoint Time Clock website without using the CenterPoint Time Clock app or use both simultaneously.
Provide your employees with the following documentation pieces: Using CenterPoint Time Clock for Employees, Employee Quick Reference for CenterPoint Time Clock Website, or Employee Quick Reference for the CenterPoint Time Clock App.
Download, Install and Use the CenterPoint Time Clock App (Optional)
The optional CenterPoint Time Clock app can be downloaded and used on individual employee mobile devices. Employees log into the app and the website with the same email address and password credentials.
- From the Apple App Store or Google Play Store, search for and install the CenterPoint Time Clock app.
- Provide your employees with the following documentation piece Employee Quick Reference for the CenterPoint Time Clock App
Option 2: CenterPoint Time Clock Kiosk
Employees can log time through the website, app or kiosk. If you will be allowing access to the CenterPoint time clock via kiosk, all setup is performed by the Payroll Administrator, there is no setup for your employees.
Initial Setup
From the tablet device, select either the Apple App Store or Google Play Store and search for the CenterPoint Time Clock Kiosk app and then download and install the app.
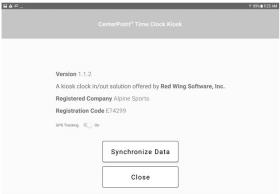
- From the tablet device, select the Time Clock Kiosk
 icon. The CenterPoint Time Clock Kiosk - Unregistered Device displays.
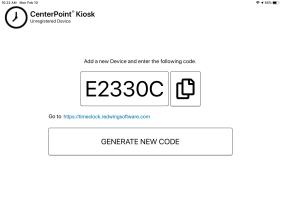
- If you plan to complete the CenterPoint Time Clock Kiosk setup from the tablet device, click the Copy
 icon and then click the https://timeclock.redwingsoftware.com/admin/managekiosks link under the code, click Login, enter your credentials, and click Log in to log in as an Administrator user.
OR
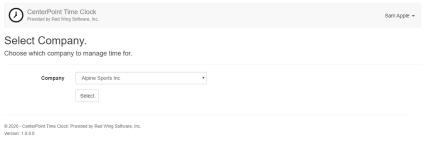
If you plan to complete the CenterPoint Time Clock Kiosk setup from a computer, note the code displayed and then go to https://timeclock.redwingsoftware.com/admin/managekiosks, click Login, enter your credentials, and click Log in to log in as an Administrator user.
- If you have multiple companies, select the Company you are setting the CenterPoint Time Clock Kiosk up for, and then click Select.
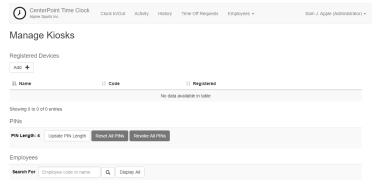
- From the Manage Kiosks screen, click Add +.
- From the Add screen, paste the code you copied from above or enter the code noted above, and then click Continue.
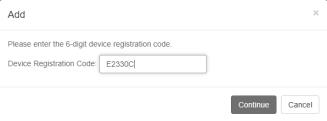
- The Manage Kiosks screen displays with the device code you entered above.
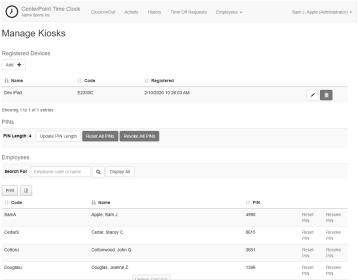
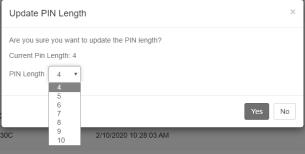
- The PINs used by your employees to clock in/clock out will be 4 digits by default. If you wish to change the PIN length (from 4 digits through 10 digits), select Update PIN Length, select the PIN Length, and then click Yes.
- PINs are not assigned upon initial setup automatically. To assign PINs to all employees, from the Manage Kiosks screen, click Reset All PINs.
- Next you will need to distribute PINs to your employees for the purpose of clocking and out on the Kiosk. Click Display All to display all assigned PINs or use search to find a PIN for a specific employee.
- To help in the process of distributing employee PINs, click Print to print a report of all of the employee PINs displayed or click the Export
 icon to create a spreadsheet that can be used to distribute the appropriate PINs to your employees.
 - After PINs have been distributed, employees can begin logging time in the Kiosk.
Tablet Setup for Employee Use
Enable/Disable GPS Clock-In/Out from Kiosk
Note: The GPS Clock-In/Out setting is disabled by default.
To enable/disable GPS location data gathering when employees clock in and clock out:
-
Double-tap on the CenterPoint Time Clock Kiosk icon in the upper left side of the application.
- Toggle the GPS Tracking switch between On (default) and Off.
- Click Close.
Pin CenterPoint Time Clock Kiosk App
To ensure employees do not accidentally close the CenterPoint Time Clock Kiosk app or access other apps, tablets have a feature to lock one app open and require a passcode to close it.
iPad Device (As of iOS 13)
- Select Settings > Accessibility > Guided Access.
- Toggle the Guided Access settings On.
- In the Guided Access settings, follow the on screen instructions to determine how you want your device to operate. For example, If you want to set a passcode, select Passcode Settings > Set Guided Access Passcode. It is recommended to set a passcode to prevent accidental app closure by employees.
- In the Guided Access settings, you may want to set how long it takes your iPad to automatically lock (the iPad goes to sleep and the Home button must be clicked to open the Kiosk again). Select Display Auto-Lock, and then select your preferred length of time.
- Open the CenterPoint Time Clock Kiosk.
- To start guided Access, triple-click the Home button.
- To exit guided access, triple-click the Home button and enter your PIN if required.
Android Device (As of Android 10)
Note: The Android settings vary by manufacturer. You will need to locate the equivalent selections for your specific device from your manufacturer. For example, the steps below are for a Samsung device.
- Select Settings > Biometrics and Security > Other Security Settings > Pin Windows.
- Turn on Pin windows.
- Turn on the Ask for Pin When Unpinning option. When this setting is set, you will be asked for your PIN, pattern or password for unpinning.
Note: To pin a screen, follow the instructions on the bottom of the Pin Windows screen, or continue below.
- Return to your Home screen.
- Open the CenterPoint Time Clock Kiosk.
- Click the Recents button or icon to the left of your home button.
- Locate the app you want to pin and click the Pin icon or at the top of the image, tap the app's icon.
- Select to pin the app.
- To unpin a pinned app, hold the Recents and Back buttons/icons at the same time.
Administration and Maintenance
Revoke a PIN
This will remove the PIN from the employee and restrict access to the Kiosk.
- From the Manage Kiosks screen, under Employees, in the Search For box, enter the employee abbreviation or employee name that you wish to revoke a PIN for and then click the Search icon or click Display All.
- At the right side of the screen, click Revoke PIN.
- At the displayed message, click Yes.
Assign or Reset an Individual Employee PIN
- From the Manage Kiosks screen, under Employees, in the Search For box, enter the employee abbreviation or employee name that you wish to assign a PIN for and then click the Search icon, or click Display All.
- At the right side of the screen, click Reset PIN.
- At the displayed message, click Yes. A new PIN will be assigned to the employee.
Reset All PINs
This process will reset all pins based on your PIN length settings above.
- From the Manage Kiosks screen, Under PINs, click Reset All PINs.
- At the displayed message, click Yes.
Revoke All PINs
This will remove all PINs from employees and will restrict access to the Kiosk.
- From the Manage Kiosks screen, Under PINs, click Revoke All PINs.
- At the displayed message, click Yes.
Change the Kiosk Device Name
- Under Registered Devices, click the Edit icon
 .
. - From the Enter Name screen, enter the new Device Name and then click Continue.
Delete a Kiosk Device
- Under Registered Devices, click the Delete icon
 .
. - From Delete screen, enter the Device Code you want to delete, and then click Continue.
Using the CenterPoint Time Clock Kiosk
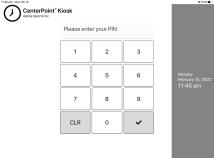
Clock In
- From the CenterPoint Time Clock Kiosk display, enter an employee PIN and click
 .
.
- From the Clocking In screen, confirm your identity by clicking Yes, That's Me or click I'm Not... and then repeat steps 1-2 again.
- When the Thanks screen displays, the clock in process in complete. No action is necessary.
Clock Out
- Form the CenterPoint Time Clock Kiosk display, enter an employee PIN and click .
- From the Clocking Out screen, confirm your identity by clicking Yes, That's Me or click I'm Not... and then repeat steps 1-2 again.
- If prompted to enter information regarding breaks, pay defaults, notes, etc., complete the entry and click Done.
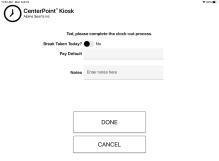
- When the Thanks screen displays, the clock out process in complete. No action is necessary.
Step 4: Next Steps and Additional Documentation
- Importing CenterPoint Time Clock entries into CenterPoint Payroll
For more information see the Importing CenterPoint Time Clock Entries into CenterPoint Payroll document.
- In CenterPoint Payroll, select Processes > Time Sheets or Processes > Payroll Time Sheets.
- Click the Time Import button at the bottom of the screen.
- Enter your Company, From and To dates.
- Select the Only Approved Time check box to draw in time sheets that have been approved by a supervisor or administrator. Leave the check box unchecked to pull in all time approved or not approved.
- Click the Next button.
- View your imported time on the Time Sheets screen.
- Importing Time Sheets into a Pay Run
For more information see the Processing a Pay Run/Pay Employees document.
- In CenterPoint Payroll, select Processes > Pay Employees or Processes > Payroll > Pay Employees.
- Click New to start a new payroll or select an existing payroll and then click Edit.
- Enter specifics about the pay run including Company, Bank Account, Pay Period From/To dates, Pay Date, etc.
- From the bottom-left side of the screen, select the employees for this pay run and move the selected employees to the right side of the screen.
- Click Import Time Sheets. Click OK.
- Select the 2. Enter Pay tab and continue processing your payroll as usual.
- Available Documentation: The following documentation is available and can be distributed to your administrators, supervisors or employees. Click the links below or go to https://www.redwingsoftware.com/home/how2/payroll/Content/Home_PR.htm and enter “Time Clock” to view all documentation.
- Administrators and Supervisors
- CenterPoint Time Clock for Supervisors – This document contains detailed information for employees who will use the time clock as a supervisor, for example for approving time and time off requests.
- Supervisors Quick Reference – This document contains concise information for employees who will use the time clock as a supervisor, for example for approving time and time off requests.
- Employees
- Using CenterPoint Time Clock for Employees – This document contains detailed information about using the CenterPoint Time clock website, CenterPoint Time Clock app, and CenterPoint Time Clock Kiosk for both employees and supervisors.
- Employee Quick Reference for CenterPoint Time Clock Website – This document contains concise information about using the CenterPoint Time Clock website for employees that choose to use the CenterPoint Time Clock website.
- Employee Quick Reference for the CenterPoint Time Clock App - This document contains concise information about using the CenterPoint Time Clock app for employees that choose to use the CenterPoint Time Clock app.
Frequently Asked Questions
Q: I have setup items (Employees, Pay defaults, departments, etc.) in CenterPoint Payroll that are not the same as those listed on the CenterPoint Time Clock. How can I make the website match my CenterPoint Payroll setup?
A: Perform a manual synchronization by following the steps below:
- Select Setup > Payroll Details > Time Clock Settings.
- On the General tab, click Synchronize.
- Click OK.
Q: My employee cannot register, how can I trouble shoot?
A: There are two steps to registration, creating a Red Wing Software account and linking the account to CenterPoint Time Clock. Determine which part of the process the employee is having trouble with.
- If they cannot create a Red Wing Software account, verify they are using an email address they have access to and that they have completed the verification process by clicking the link in the verification email.
- If they have not received the verification email, double check they entered the correct email address and check the junk mail folders.
- If they can log in but are being prompted to register the company:
- Verify they are entering the correct Company and Employee codes.
- Is it possible they registered already with a different email address? Try unregistering the employee so they can start the registration over. This does not remove their Red Wing Software log in, but does unlink their log in from CenterPoint Time Clock. They will then be able to re-link using their preferred email address.
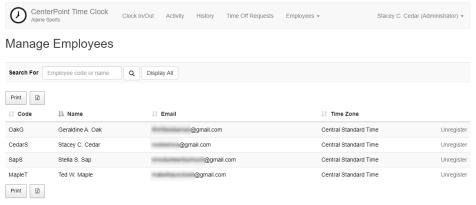
- Log in as an Administrator, select Name (Administrator) > Manage Employees. Select the employee or click Display All.
- Select the employee, and then click Unregister.
- Click Print to print a report of the employees listed or click
to export the employees listed to a Microsoft® Excel spreadsheet.
Q: How does CenterPoint Time Clock handle overtime hours?
A: CenterPoint Time Clock does not does not determine if hours entered qualify as overtime, however, CenterPoint Payroll allows for overtime processing after time has been imported. Follow the Overtime Processing document for more information.
Q: Does CenterPoint Time Clock record the location of my employees clock in/out entries?
A: Yes, all clock in and out entries created by employees via the CenterPoint Time Clock website or CenterPoint Time Clock app record a GPS coordinate.
Q: Can CenterPoint Time Clock be configured to work with centralized card readers and biometric devices?
A: No, but the CenterPoint Time Clock Kiosk allows for a centralized solution on Apple and Android tablets. See the Option 2: CenterPoint Time Clock Kiosk section in this document.
Q: An employee has forgotten their password for the CenterPoint Time Clock App. How do they retrieve their password?
A: To reset a CenterPoint Time Clock password they will need to go to the CenterPoint Time Clock website (https://timeclock.redwingsoftware.com). On the CenterPoint Time Clock website, click Login and click the “Forgot your password?” link and follow the on screen instructions.
Q: When my employees try to clock in or out from the CenterPoint Kiosk, they are asked for a password before the Kiosk screen displays, why?
A: You likely have a lock screen password set up on the tablet device that is requiring a password. If using the Kiosk app for Apple or Android, it is recommended that you use the guided access or pin settings to lock the app with a password. If set this way, the need for the lock screen password is diminished.
Q: My employee uses the Kiosk and cannot remember their PIN. How can I look it up for them?
A: Log into the CenterPoint Time Clock website at https://timeclock.redwingsoftware.com as an Administrator user.
- Select Name (Administrator) > Manage Kiosks
- Enter their name or employee code into the Search for box. Press Enter or click the
 button.
 - Their PIN will display. If they would like a new PIN, click Reset PIN.
Q: The line to clock in at the Kiosk gets long at the start and end of shifts. Can we have more than one Kiosk?
A: Yes, you can register as many tablet devices as Kiosks as you would like. Log in as Administrator, select Name (Administrator) > Manage Kiosks and click Add to register additional devices. Employees can clock in and out from any of your registered devices.
Q: Can my employees select their own PIN for the Kiosk?
A: No, PINs are required to be unique. The CenterPoint Time Clock assigns PINs to employees. As an administrator, you have the ability to reset PINs however. See Step 3, Option 2, Administration and Maintenance in this document.
Q: My company has the CenterPoint Time Clock and Publish Pay Advice services. Can my employees log into both services with one username and password?
A: Yes. Your employee creates one Red Wing Software account. After the Red Wing Software account is created, they can link to either service with he same login credentials.
|
Document: 3298 |
|---|